August06
Make a Nice, Smooth Bevel in Illustrator (a how-to)
While working on a project for one of my clients, I encountered the need to make a beveled object, but I didn't want to create several 300+ dpi objects in Photoshop. So, I took some time and figured out a way to do it in Illustrator. Some of my co-workers thought I was crazy, but it worked and now I have 1.5mb files rather than 40mb. It seemed worth it.
This is my first foray into posting a tutorial. I'm sure it's not perfect, but it's where I landed and I was pleased with the outcome. If you have other tips or ideas, please post them in the comments below for all design nerds to enjoy. Oh yeah, clicking on the thumbnails will allow you to see bigger images.
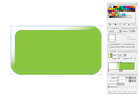
 1. Create a shape
Any ol' shape will do. For this exercise, I chose a rounded edge rectangle. Fill the shape with a solid color and remove the border.
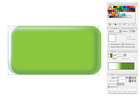
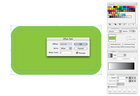 2. Offset path
This will give you the same shape at a different size -- it helps maintain the aspect ratio of everything (including curves). You can see the settings in the screenshot. Instead of going outside the shape, I went inside.
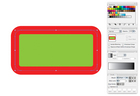 3. Add a center stroke to new shape and increase stroke weight
Adding the stroke to the center will help in a later step (that would be step 5, if you just HAVE to know), so table that for now. But the important thing here is to match the weight of the stroke to the edge of the original shape. If you don't, then your bevel will start further in from the edge.
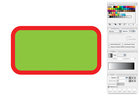
4. Outline the stroke
Once you have the stroke weight at the correct size, it's time to outline the stroke -- this makes the stroke into a solid object.
5. Time to divide the shapes
When you outline a shape, it groups the original shape and the new outline shape together. Make sure this new group is selected and then go to your Pathfinder palette and hit the divide button. Ungroup the shapes and you should now have three shapes: 1) the original inner shape that you outlined the stroke on, 2) the outer outlined stroke, and, 3) the inner outlined stroke. By setting the stroke to the center of the object, we were able to come away with three shapes here (I played around with this and I can't explain why this is, but this is how we want it anyway).
 6. Delete the two inner shapes
Yeah, do what the title says -- delete the two inner-most shapes. This will leave you with the outer stroke object, aka, the beginning of your bevel.
 7. Gradient work, part one
Set a normal black/white gradient to the stroke object and set the gradient degree to -65. This will put the black half in the bottom-right of the stroke object.
 8. Gradient work, part two
This one isn't THAT complicated, it just has a few steps. 1) Add another color square in the gradient -- from left to right, it should be a white square, gray square and a black square. 2) Click the white square and make sure the % is set to 0 (it should be as the default). 3) Click the gray square and change the % to 45. 4) Click the black square and change the % to 52. 5) Click the left diamond and change the % to 87. 6) Click the right diamond and make sure the % is at 50 (it should be as the default). Shoosh.
 9. Gradient work, part three
Now we're going to replace the gray and black swatches. Make sure the stroke object is still selected. 1) From the Swatch palette, grab the color of the original shape and drag it on top of the gray square in the Gradient palette. Let go of the swatch -- the gray should change to the color of the original shape below your stroke object. 2) Repeat step one and replace the black swatch.
 10. Gradient work, part four
To create the darker part of the bevel, we need to modify the right-most color square in your gradient. Making sure the stroke object is still selected, click on the right-most square in the Gradient palette (the arrow directly above the square should become black). From here, open up your Color palette. If your original color is a pantone color, convert it to CMYK. Add between 30-50% black to the color (just slide the K bar to the right)
 11. Make it semi-transparent
Head over to your Transparency palette and make the stroke object 50% transparent.
 12. Blur it
Go to your Filters menu and head down to the SVG fly-out. Select Gaussian Blur 4. The sweet thing about this filter is that it leaves your shape unaffected -- allowing you to make changes even AFTER you've applied the filter. Even if you messed up a color, or transparency, you can change that without having to undo anything. We're almost done, but we need to get rid of the halo around the object.
 13. Move it
We need to work on the base shape some now, so select the stroke object and get it out of the way. I did a shift+left arrow nudge. Just remember how many times you arrowed over -- one is sufficient.
14. Make a copy
Select the base shape, copy it (cmd+c) and paste it to the front (cmd+f). Now bring that shape to the front (shift+cmd+]).
 15. Move that, too
Recall how many shift+arrows you did for the stroke object and do the exact same with the new base shape copy.
 16. Mask 'em
Grab both the new base shape copy and the stroke object. Right click on the shape and select "Create clipping mask." This gets rid of that halo.
17. Move 'em back
Move the stroke object BACK over the original shape -- just reverse the shift+arrow action you did in steps 13 or 15.
 18. You're done.
Seriously. That's it. Now you have a sweet vectorized beveled object. Rastered images be damned!!!
That's all I got for ya. Lemme know what you think.
+ original post date: August 6, 2008 09:02 PM
+ categories: Things I've Made
comments24
(comments rss feed)
if you want to see some other cool stuff start playing around with the opacity mask and blend functions. they allow you to create some really cool vector looking web 2.0 stuff.
+ author: shaun Crockett
+ posted: August 6, 2008 09:34 PM
Thanks alot, i'm designing some leaflets at the minute and I really wanted to do add this effect using illustrator without exporting to photosop.
Great tips.
+ author: Muay Thai Training
+ posted: February 9, 2009 03:32 AM
Great tutorial Seth. Just awesome, thanks so much. Keep up the good work.
+ author: Mason H.
+ posted: February 14, 2009 04:35 PM
just what I needed--thanks so much!
They've integrated so much of PS into Illustrator, but the 3D options don't offer smoothing of bevel... (makes you appreciate what PS does automatically, eh?)
+ author: halo_bone
+ posted: May 7, 2009 02:18 AM
Yes!
You succeeed where other fail.
+ author: Magnus Axelsson
+ posted: May 26, 2009 04:06 AM
Thanks for such a helpful article, which I found really useful. Why Illustrator cannot do the bevel done in Photoshop (even if a vector equivalent as an Illustrator effect) is anyone's guess.
If it helps anyone, I found a way to simplify it further (using Illustrator CS4). In step 1 duplicate the shape and bring that to the front. In step 2 create the offset path on that shape, then also select the duplicated shape. In step 3 do a Pathfinder "exlude". You are then ready to start step 7.
+ author: Tim Cole
+ posted: July 8, 2009 08:07 AM
so smooth and good and very very well done.
Since I cannot give you a clap on the shoulder and say "good work" please do so yourself.
You deserve it.
+ author: Jens
+ posted: September 8, 2009 10:50 AM
Thanks for sharing. I was looking to a solution for this problem!
+ author: RK
+ posted: October 20, 2009 03:33 PM
This is a great tutorial, thanks so much!
+ author: danielle
+ posted: October 24, 2009 10:24 PM
hey thanks so much for posting this tutorial...it really helped. although i didn't understand why some of the steps were necessary, the effect was what i wanted so that's all that count. you'll bet i will favorite this page!!!
+ author: Lynet Witty
+ posted: February 25, 2010 03:37 PM
Thanks for posting this. It's so helpful! I have to make 50 different little objects with a bevel and this is super fast and easy!
+ author: Angela
+ posted: July 28, 2010 12:39 PM
Hey Seth, I interned at SHS a few years back. Just wanted to say hey, hope things are going well and thanks for solving this problem for us - works perfectly!
+ author: JoAnn Arello
+ posted: July 28, 2010 02:23 PM
where is the offset path?
+ author: diana
+ posted: November 1, 2010 09:23 PM
Thank you, useful!
Why Illustrator don't have a easy way to do this, like InDesign?
+ author: Xevi
+ posted: November 23, 2010 04:36 AM
Seth, Thanks so much for this. I needed to do this for exactly the same reason you mentioned, avoiding huge PSD files! Once completed this tutorial put a smile on my face!
I did this on an oval shape and it works brill!!!
Peace out!
+ author: Urbanmusk
+ posted: November 26, 2010 06:10 AM
THANK YOU SO MUCH FOR THIS GRATE TUTORIAL
+ author: Vertex
+ posted: April 18, 2011 05:48 AM
Wow, this tutorial was really hard to follow. I had to keep going off to Google-search other things to figure out how you did what you were doing. Not bad for a first tutorial, but you might wanna be more explanatory, 'cause beginners like me might get lost. Maybe more images, or whatnot.
Good job, though. I figured it out. :)
+ author: Erin
+ posted: July 12, 2011 09:09 AM
Great tut. I think some of the steps can be refined, for example you can directly go for the colors you want in step 8. And instead of moving here and there in steps 13-18, why not using the layers panel to directly select objects?
+ author: kmc
+ posted: August 2, 2011 06:53 AM
This trick works alright for convex shapes. But as soon as you try to apply it on a non-convex shape (like for example an hour-glass shape) it does not give the required effects. Still need to find a solution for that...
+ author: Hildo Bijl
+ posted: January 31, 2012 04:36 AM
Thank you sooo much! Your tut was so very easy to follow and it's making the bevel look just as good and as smooth as in PhotoShop, but as a vector image! You made my day. Keep posting cool stuff that I can ad to my arsenal!
Thanks@
Mark Guthrie
+ author: Mark Guthrie
+ posted: June 6, 2012 11:58 PM
Thank you. Well done!
+ author: Ted
+ posted: September 8, 2012 04:20 PM
OMG I LOVE YOU you save me :D
+ author: loveyou
+ posted: November 6, 2012 09:39 AM
You are...wait for it..AWESOME!
+ author: Amy Lichtenwalter
+ posted: September 14, 2013 06:37 AM
Thank you for the useful tutorial!
+ author: Shane
+ posted: March 14, 2015 01:17 AM
post a comment